> For the complete documentation index, see [llms.txt](https://docs.inspiredflight.com/inspired-documentation/llms.txt). Markdown versions of documentation pages are available by appending `.md` to page URLs; this page is available as [Markdown](https://docs.inspiredflight.com/inspired-documentation/products/ground-control-stations/herelink/herelink-wired-screen-sharing.md).

# Herelink Wired Screen Sharing

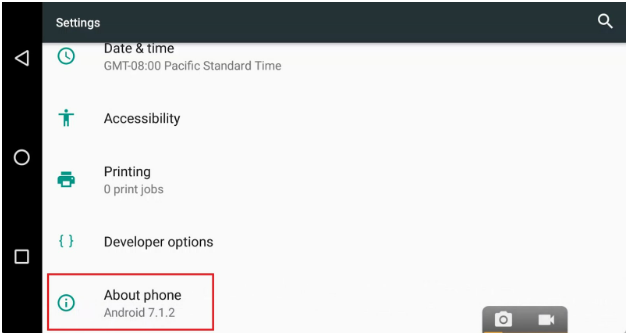
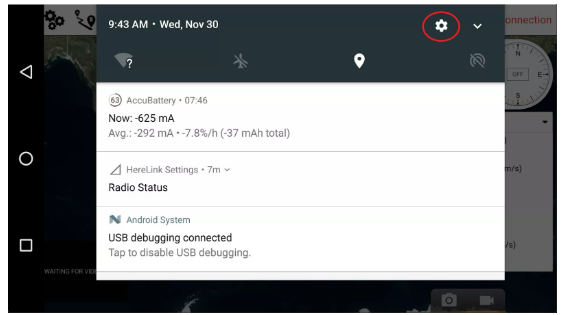
<table><thead><tr><th width="122" align="center">STEP</th><th>ACTION</th></tr></thead><tbody><tr><td align="center">1</td><td>On a Windows PC, download the <a href="https://scrcpy.org/">SCRCPY</a> .zip file, and extract the file folder.  </td></tr><tr><td align="center">2</td><td>Turn on your Herelink controller and access the Android Settings.  </td></tr></tbody></table>

<figure><img src="/files/Uzw0oRgEzFHneivZUtF8" alt=""><figcaption></figcaption></figure>

<table data-header-hidden><thead><tr><th width="130" align="center"></th><th></th></tr></thead><tbody><tr><td align="center">3</td><td>In Android Settings, scroll down and select "About Phone."</td></tr></tbody></table>

<figure><img src="/files/ItoWuvxfKWtEnh8pvN19" alt=""><figcaption></figcaption></figure>

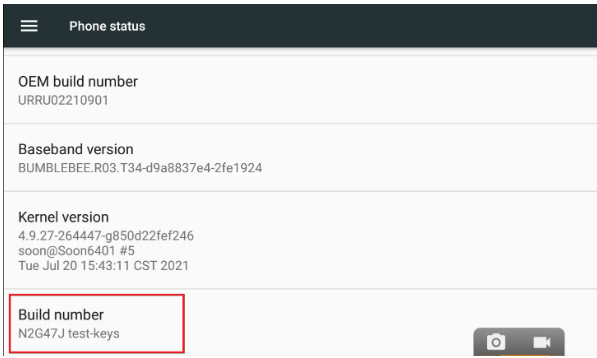
<table data-header-hidden><thead><tr><th width="129" align="center"></th><th></th></tr></thead><tbody><tr><td align="center">4</td><td>Scroll down to "Build number," and tap on it 7 times or until Developer is unlocked</td></tr></tbody></table>

&#x20;

<figure><img src="/files/vNvr6GkZbIA7Xe5VCq7Q" alt=""><figcaption></figcaption></figure>

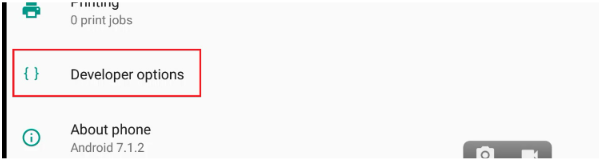
<table data-header-hidden><thead><tr><th width="126" align="center"></th><th></th></tr></thead><tbody><tr><td align="center">5</td><td>Once Developer is unlocked, go back one screen and select "Developer Options."</td></tr></tbody></table>

<figure><img src="/files/hOCJ13dTr9sLC7gY0a3Q" alt=""><figcaption></figcaption></figure>

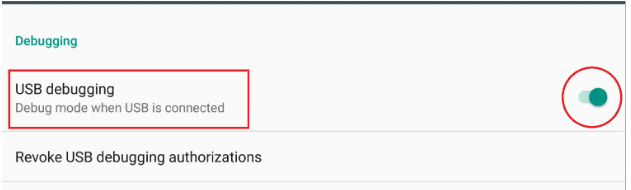
<table data-header-hidden><thead><tr><th width="142" align="center"></th><th></th></tr></thead><tbody><tr><td align="center">6</td><td>Scroll down and find "USB Debugging," and enable this feature</td></tr></tbody></table>

&#x20;&#x20;

<figure><img src="/files/FYWbqDBlKKhCPdJkjzIC" alt=""><figcaption></figcaption></figure>

<table data-header-hidden><thead><tr><th width="142" align="center"></th><th></th></tr></thead><tbody><tr><td align="center">7</td><td>Connect the Herelink controller to your PC via a USB cable</td></tr><tr><td align="center">8</td><td>Once the controller is connected, go to the extracted folder and open the SCRCPY application</td></tr></tbody></table>

<figure><img src="/files/mn1eIS0NWQieKSCdlEoA" alt=""><figcaption></figcaption></figure>

<table data-header-hidden><thead><tr><th width="153" align="center"></th><th></th></tr></thead><tbody><tr><td align="center">9</td><td>Once scrcpy opens, you should now be able to see and control your Herelink screen on your computer</td></tr></tbody></table>

&#x20;&#x20;